Friday, August 21, 2009
Baby Shower #1
Last weekend was my baby shower that my best friend, sister and aunts threw for me! It was perfect and I had so much fun! We had to play a game where you had to match the animal with what their baby's are called. It was VERY hard! Do you know that a baby Eagle is called a Fledgling? Or a baby mouse is called a pinkie?
Here are a couple pictures and one of all the amazing gifts our little girl received!
My shower with Adams family is this weekend! So excited for that too! Once this weekend is over we can assess what we haven't gotten, purchase it and can be "ready" for the baby to be here! (at least as ready as can be I guess) :)
Saturday, August 15, 2009
Nursery update
This is the status of the nursery at the beginning of the weekend:
After painting the walls, we decided it was time to get rid of the ugly cheapo lookin ceiling fan. We thought about keeping it for the fan aspect and using a lamp but Adam hated the fan enough that a plug in fan and dimmable light was just as nice as a plug in light and ceiling fan.
Having a fan in a nursery reduces the risk of SIDS and when you're trying to get a baby to sleep, dim light is very nice.
New Light and switch:
We also have had plans to switch out all the almond light switches and outlets in the house for nice clean white ones but we haven't gotten there yet. While we had all the outlet covers off for painting and already fiddling with the one light switch Adam decided to do all of them.
My first baby shower is this weekend and I'm so excited! I'm waiting until the showers are over before finalizing and finishing organizing the nursery.
Friday, August 14, 2009
Dresser
Adam's newest woodworking project is a dresser. If you remember the nightstands that he made for our room, he made a dresser to match. We needed a dresser for the baby's room so this was as good of an opportunity than any!
As with the nightstands he inlayed some walnut on the top.
This holds our stuff a lot better than our old one. Probably because it's custom made for our needs huh? :)
When he put the knobs on, the standard screws were too long for how thick the drawer faces were.
So last night he went through and replaced all of those. It's now officially finished!
Thursday, August 13, 2009
Livingroom Floorboards
Wednesday, August 12, 2009
Canning Jalepeno and Banana Peppers
I use jalapeƱo and banana peppers in my salsa so I have them planted in my garden but my tomatoes aren't ready for salsa yet so I have a bunch of extra peppers. Since these are things you can use in or on many other food items I figured I'd give canning them a go.
I found recipe's on the internet.
For the Banana peppers I pickled them.
10-12 banana peppers
1 hot pepper
1 C. white vinegar
1 C. water
1/2 t. salt
1/2 t. dry mustard seed
1 t. peppercorns
2 cloves garlic
Bring vinegar, water, salt and mustard seed to a boil.
Sterilize your jars. For this I just stick them in a glass dish w/ a little water in the bottom and stick them in the microwave for 5-6 minutes.
This is a pic from when I was doing pickles but you get the idea:
You'll also want to sterilize your lids. To do this I stick them in some boiling water.
While things are boiling/sterilizing cut up your peppers
Also cut up one hot pepper.
When all that is done, grab a jar, fill it with the peppers, the slices of your hot pepper, peppercorns and garlic. You might want to layer in the garlic, hot peppers and peppercorns. Pour boiling brine over. Leave 1/4" headspace.
Wipe the top of the jar to make sure there isn't anything to hinder your seal and put your lid and ring on.
You should give them a water bath at this point. I didn't and they sealed just fine. If you aren't going to give them a water bath, make sure you work quickly enough that everything is all nice and hot.
I think this recipe will give you a pint jar.
I however don't use a ton of peppers and only wanted a few at a time for putting on a pizza or nachos or something like that. I used the 4 oz. jelly jars.
That's it for those.
For the Jalepenos I also found a recipe online.
10 cups jalepeno peppers sliced (you can also use this recipe for banana)
2 cloves garlic
4 cups white vinegar
2 tsp pickling salt
Sterilize everything and boil your vinegar and salt.
Pack jars w/ peppers and 1/2 clove garlic
Pour brine over and leave 1/4" headspace.
Wipe top of jar, put lids and rings on.
Water bath (or not if you so choose)
I did little jars again but I'd guess this recipe is going to make you maybe 3 pints.
I would leave both of these sit for a few weeks before eating.
I found recipe's on the internet.
For the Banana peppers I pickled them.
10-12 banana peppers
1 hot pepper
1 C. white vinegar
1 C. water
1/2 t. salt
1/2 t. dry mustard seed
1 t. peppercorns
2 cloves garlic
Bring vinegar, water, salt and mustard seed to a boil.
Sterilize your jars. For this I just stick them in a glass dish w/ a little water in the bottom and stick them in the microwave for 5-6 minutes.
This is a pic from when I was doing pickles but you get the idea:
You'll also want to sterilize your lids. To do this I stick them in some boiling water.
While things are boiling/sterilizing cut up your peppers
Also cut up one hot pepper.
When all that is done, grab a jar, fill it with the peppers, the slices of your hot pepper, peppercorns and garlic. You might want to layer in the garlic, hot peppers and peppercorns. Pour boiling brine over. Leave 1/4" headspace.
Wipe the top of the jar to make sure there isn't anything to hinder your seal and put your lid and ring on.
You should give them a water bath at this point. I didn't and they sealed just fine. If you aren't going to give them a water bath, make sure you work quickly enough that everything is all nice and hot.
I think this recipe will give you a pint jar.
I however don't use a ton of peppers and only wanted a few at a time for putting on a pizza or nachos or something like that. I used the 4 oz. jelly jars.
That's it for those.
For the Jalepenos I also found a recipe online.
10 cups jalepeno peppers sliced (you can also use this recipe for banana)
2 cloves garlic
4 cups white vinegar
2 tsp pickling salt
Sterilize everything and boil your vinegar and salt.
Pack jars w/ peppers and 1/2 clove garlic
Pour brine over and leave 1/4" headspace.
Wipe top of jar, put lids and rings on.
Water bath (or not if you so choose)
I did little jars again but I'd guess this recipe is going to make you maybe 3 pints.
I would leave both of these sit for a few weeks before eating.
Tuesday, August 11, 2009
Freezing Corn Whole
I've done a couple batches of sweet corn this year. I posted instructions on how I do my freezer corn last year here, but this year I also decided to freeze a little on the cob.
All you have to do is shuck your corn and clean it.
At this point you might want to blanch the corn if you are going to be leaving it in the freezer for an extended amount of time. I plan to leave it in max 3 months so I didn't blanch.
Then just package!
Once again I'm using the Ziplock Vacuum bags. That way I can open the bag, pull a few out and reseal.
Monday, August 10, 2009
Busy Weekend
We had a busy weekend accomplishing lots! I'll have many posts coming up but I'll start out by saying that there is a new blog linked up over to the right.
My down with technology hubs finally decided to start a blog. His might not be as exciting to many of you as it's named Code & !Code. So there you will find information about programming. BUT he'll also throw in some not code stuff. Hence the !Code. You'll have to visit his blog to find out what that means. :)
Check it out:
Code & !Code
Here's project #1 that was accomoplished this weekend. Organization!
I don't have before pics but just imagine a mess :)
Since this is right when you walk in the house the mess of stuff under our desk in the kitchen drove Adam nuts. We also had a trash can beside the desk for recycling but it seemed to always be overflowing.
The first thing we did was get a couple larger containers that stack for recycling which seem to be holding a LOT more! Then Adam built a shelf so that we could stack the stuff under the desk.
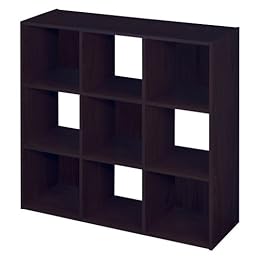
Adam also built a couple shelves for in the baby's closet. Instead of buying something like this that is all the rage right now:
I figured I could just get some cheap baskets and put them on shelves.
So my cheap solution looks like:
Subscribe to:
Posts (Atom)